At Fairing, we use Postgres as our core database. For anyone who’s spent years in Excel...it’s a dream. After a few searches, I realized there was no central resource/how-to for ecommerce analysis in Postgres (short for PostgreSQL), especially for Shopify. The majority of direct-to-consumer brands don’t have data engineers in-house, so as a brand owner or digital marketer, getting a database up and running can feel like a monumental task. But, don’t fret: setting up a database with Shopify is straightforward. This post will walk you through all the necessary steps to get you up and running.
Let’s say you have a report building process in Excel that takes thirty minutes every time you want to update it. The drill usually involves exporting your Shopify orders data, running a few vlookups and pivot tables, and possibly some manual entry. We’ve all done it. Now imagine, instead of exporting your Shopify order data every time you want to run a simple report, that order data is automatically updated to your Excel spreadsheet, or, in our case, a database. No more filtering and slicing and dicing. The data is already cleaned and ready to use, so you can spend those thirty minutes of your day on something smarter—like analysis, or lunch.
As a digital marketer, you may or not be overly familiar with databases, as you’re used to using Excel or Google Sheets for most, if not all, of your analysis. So, what is a database? The easiest way to conceptualize a database is to compare it to what you already know: an Excel spreadsheet. Within a database, you have tables, which are similar in theory to the columns and rows of Excel. I like to envision a database as a self-updating Excel file. It’s like a little employee hiding inside a computer, handing you an updated file every time you ask for it.
1. Creating Your Database
Good news. You don’t need a developer to create a Postgres database instance. With Heroku’s database-as-a-service, creating a Postgres database only takes a few minutes, even for non-technical people.
First, you’ll need to create a Heroku account if you don’t already have one (you can select any language in the onboarding flow). After you’ve created an account, you’ll be presented with the “Create New App” screen—simply follow the prompts to create an app. Once your app is created, click “Resources.” Then, in the “Add-Ons,” search for “Postgres.” Heroku’s free plan unfortunately doesn’t offer enough rows to fully extract your Shopify instance, so you’ll need to select Hobby Basic ($9/month).

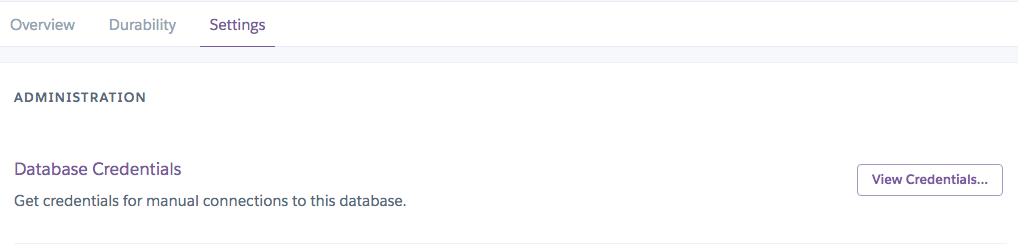
After you’ve provisioned your database, select Heroku Postgres in your add-ons list to open your dashboard. Select “Settings,” and click “View Credentials.” You’ll need these in the steps below.
2. Extracting Data from Shopify to Your Postgres Database
We’ll use an ETL service to pull your order data from your Shopify account to your newly created Postgres database. ETL stands for extract, transform, and load; three database functions that, when combined into one solution, extract data from one database and push it to another. There are numerous ETL options to choose from, but we prefer StitchData. Unfortunately, they've removed their free tier in early 2021, so it's going to cost roughly $100-$180 a month if you're doing less than $10mm in annual revenue (it's based on row volume, so of course depends on your AOV). Another option is Fivetran, but what I've seen, it'll run you $500-800 for a similar set up–although a great solution as you scale.
After you’ve created your StitchData account, click “Destination” and enter your new Postgres Database credentials (you can leave the encryption type to None). Next, add your Shopify account by simply clicking “Add Integration,” selecting Shopify, and installing the StitchData app.
After you’ve completed these steps, StitchData will begin extracting your Shopify data and loading it into your Postgres DB. This process should take thirty minutes to an hour.
3. Querying Your Shopify Data in Postico
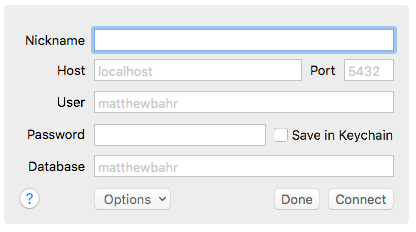
While you’re waiting for StitchData to load your data, you can install Postico and insert your database credentials. Postico is a SQL client that will allow you to query your data from your Mac (if you’re on Windows, you can use TablePlus). To add your database to Postico, simply input your Heroku database credentials after clicking File → New Favorite.
Now for some fun! Once StitchData is done syncing and your database credentials are entered in Postico, you can start querying your data. Take some time to explore the Shopify data structure by querying “SELECT *” from the various tables that are now in your newly created database.
4. Visualizing Your Data
I've been recommending Redash for a few years now and unfortunetly it was acquired and they're sunsetting the hosted version. I'm still looking for a viable solution, but for now we'll recommend https://www.metabase.com/. Metabase allows you to both query your database and build visualizations with your data. To add your data, simply create an account and add your Postgres database as a source. If you’d like, you can also write queries directly in Metabase and avoid downloading a local client.
To note, we previously recommended using Heroku DataClips feature to create visualizations in Google Sheets. Unfortunately, due to how Heroku authenticates dataclips and caches data, this is no longer a viable solution.
Now that you’re all set up, have at it! We’ll be updating this public GitHub repo regularly with some queries you can use to get you started.